
Gardening Basics
Secret to Success: 6 Essential Steps for Perfect Germination
Apr
Hi everyone! People often ask, “Why don’t my seeds ever sprout? Do I just have a ‘black thumb’?” Honestly, seed starting isn’t difficult—it’s all about those tiny, crucial details that make or break the process. Today, I’m sharing my personal roadmap for turning those tiny seeds into thriving plants!
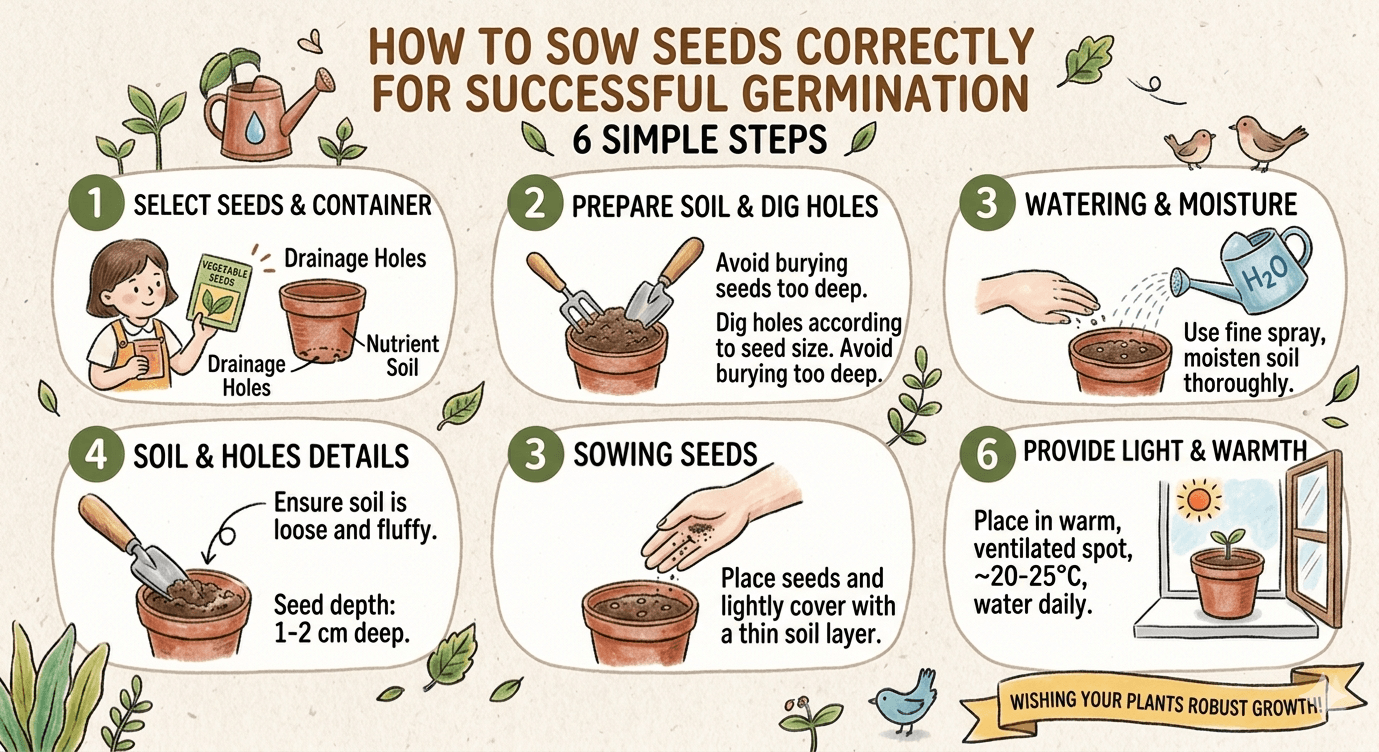
1. Give Your Seeds a “Breathable” Home
Experience has taught me that preparation is everything. When I first started, I used random containers without drainage, and my seeds ended up rotting in stagnant water. **Always choose a pot with drainage holes.**
For the best start, use a dedicated “Seed Starting Mix” rather than heavy garden soil. It’s sterile, lightweight, and ensures your seeds won’t have to fight off fungus or heavy clay.
2. Keep the Soil Loose and Light
Seeds need oxygen just as much as they need water. Before digging your holes, gently fluff the soil. As for depth, follow the golden rule: **dig a hole about 2 to 3 times the width of the seed.** If you bury them too deep, the tiny sprouts will run out of energy before they ever reach the light.
3. Sowing with a Gentle Touch
Once your seeds are in their spots, sprinkle a fine layer of soil over them. **Here is my pro-tip: give the surface a very light pat with your fingers.** This ensures “seed-to-soil contact,” which is essential for the seed to actually absorb the moisture it needs to wake up.
4. Water Like a “Gentle Rain”
This is where most beginners go wrong—pouring water directly from a cup. This force can wash seeds away or compact the soil into a hard crust. I always **use a fine-mist spray bottle or a watering can with a rose attachment.** Keep the soil consistently moist (like a wrung-out sponge), but never let it become a muddy swamp.
5. The Magic of Warmth and Light
Most seeds are happiest at temperatures between **20-25°C (68-77°F)**. I usually place my trays in a **well-ventilated spot with bright, indirect light** (like a windowsill). Avoid harsh, direct midday sun at this stage, as it can dry out the soil and “cook” the delicate new sprouts before they have a chance.
6. The Most Important Ingredient: Patience
Germination can take anywhere from a few days to two weeks depending on the variety. My morning ritual is checking for that first “green hook” breaking the surface. There is no feeling quite like seeing that burst of life—it makes every bit of effort worth it!
Quick Tip:** If your home is very dry, you can cover your pot with a bit of plastic wrap (poke a few small holes in it) to create a “mini-greenhouse.” It locks in humidity and can significantly speed up the process!
I hope these tips help you get your garden started. There’s nothing more rewarding than watching something you planted grow. Happy gardening!

